Seely English Toffee
(Another delightful and delicious delicacy extracted from Ollie's Illustrated Gourmet
Cookbook)
(Updated December 31, 2021)
The recipe has been updated to show quantities of ingredients which will not be in significant
excess at the end of the procedure.
1 lb sugar
3-1/2 quarter pound cubes of regular salted butter
12.5 ounces finely ground walnuts
4.5 ounces finely ground almonds
16 ounces milk chocolate
6.5 ounces unflavored malted milk
1 tsp vanilla flavoring
1/4 cup water
Heavy duty (wide) aluminum foil and chopping block large enough to hold one square piece.
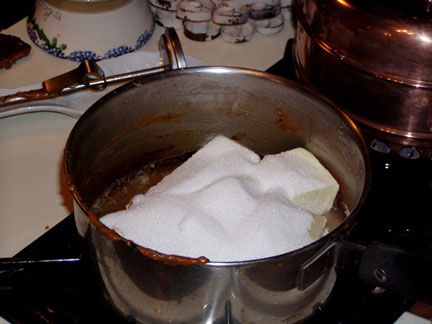
Mix sugar, butter, vanilla and water in large pan. This recipe has been seen to work with
as
little as
1/2 lb butter (2 cubes) and as much as 1 lb (4 cubes). Using a pound of butter gives it a
slightly
softer
"crunch" and it certainly pours better but some of the melted butter may not be absorbed
completely
in the sugar.
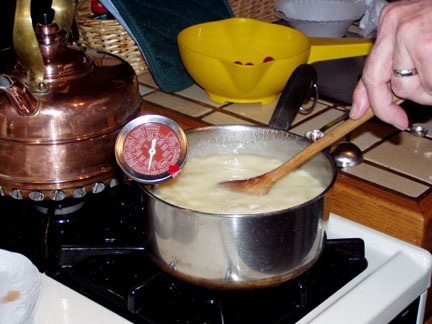
 Heat over fairly high flame, stirring constantly, to beginning of hard-crack
temperature
range (around 305oF). High flame works well to avoid phase separation that
will
occur between
sugar and butter if heating process is too slow, but when one approaches hard-crack
temperature
range, the peril of a phase separation has been passed, and the flame can be reduced to avoid
burning
the mixture. Once into hard-crack temperature range (295o -
315o F) one cup of packed ground
walnuts is added to the mixture and stirred in. If the cup of walnuts can be preheated for 2
minutes
in the microwave oven when you have reached the soft crack stage, you avoid a large drop in
temperature and possibly a phase separation. Note in the image above right that the
thermometer
had passed into the hard crack range,
Heat over fairly high flame, stirring constantly, to beginning of hard-crack
temperature
range (around 305oF). High flame works well to avoid phase separation that
will
occur between
sugar and butter if heating process is too slow, but when one approaches hard-crack
temperature
range, the peril of a phase separation has been passed, and the flame can be reduced to avoid
burning
the mixture. Once into hard-crack temperature range (295o -
315o F) one cup of packed ground
walnuts is added to the mixture and stirred in. If the cup of walnuts can be preheated for 2
minutes
in the microwave oven when you have reached the soft crack stage, you avoid a large drop in
temperature and possibly a phase separation. Note in the image above right that the
thermometer
had passed into the hard crack range,
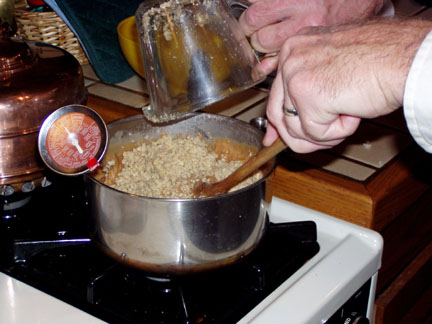
 but after having added the nuts, even though they
had been heated in the microwave oven, there was a slight drop (left)
down to around 290o between soft crack
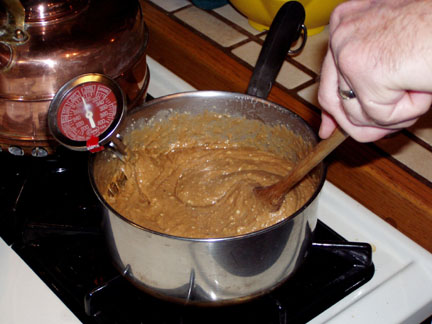
and hard crack zones. Slowly heat the mixture, constantly stirring, until
color
is a golden brown. The toffee will harden at any point in the hard-crack temperature range,
but
some
people like to heat it until the temperature moves into the caramelization temperature range.
Be
careful as the whole batch may turn into goo and you'll have to eat it with a spoon. There is a
subtle
change in taste from the mid-hard-crack point to the beginning of the caramelization point.
Some
people like the "barely-burnt" taste one gets by going into the caramelization zone, others do
not.
To be safe the first time around one ought to stop the process in the mid-hard-crack zone. In
2004 I made two batches by turning down the flame and slowly easing up to the top
temperature
of hard crack, around 315o F. It hardened beautifully, but to tell you the truth, I
don't like the "barely-burnt" taste. It is sadly below my best batches and I'm a little
embarrassed
by it. My advice: pour the batch in the middle of the hard-crack zone at around
305o F and you'll be delighted with the results.
but after having added the nuts, even though they
had been heated in the microwave oven, there was a slight drop (left)
down to around 290o between soft crack
and hard crack zones. Slowly heat the mixture, constantly stirring, until
color
is a golden brown. The toffee will harden at any point in the hard-crack temperature range,
but
some
people like to heat it until the temperature moves into the caramelization temperature range.
Be
careful as the whole batch may turn into goo and you'll have to eat it with a spoon. There is a
subtle
change in taste from the mid-hard-crack point to the beginning of the caramelization point.
Some
people like the "barely-burnt" taste one gets by going into the caramelization zone, others do
not.
To be safe the first time around one ought to stop the process in the mid-hard-crack zone. In
2004 I made two batches by turning down the flame and slowly easing up to the top
temperature
of hard crack, around 315o F. It hardened beautifully, but to tell you the truth, I
don't like the "barely-burnt" taste. It is sadly below my best batches and I'm a little
embarrassed
by it. My advice: pour the batch in the middle of the hard-crack zone at around
305o F and you'll be delighted with the results.
If a phase separation occurs, don't worry, just turn down the flame a bit and keep stirring
gently, and
be careful not to let the hot butter splash out onto your hands. The butter and sugar phases
will
go
back together again as the temperature increases. Sometimes a phase separation occurs while
in
the
hard crack zone. If that happens, turn the flame down a bit and keep stirring until the two
phases
go
back together. Even if you enter the bottom of the caramel zone, the batch will usually
harden.
To
keep the batch from being too oily, it is good to get all of the oil back into the sugar. What
one
sees
is that when the oil has separated from the sugar the mix tends not to stick to the walls of the
pan
any
longer, but the higher temperature of the walls soon cause oil absorption to occur at the
interface
and
the mix begins to stick to the wall again even though the rest of the mass has a layer of
separated
oil
sloshing around. Don't panic, just keep stirring and a few degrees higher the oil will go back
in.
Here's a caveat for you. Many candy recipes work for one person but fail for another.
The
failure may
be the result of the use of different sources of ingredients or different procedures. My
daughter
complained recently that one of her batches never hardened after having made it successfully
several years in a row. Was it the way she stirred, the brand of
butter or sugar she used or the rate at which she heated the mixture? We don't know. Her
mixture
certainly passed into the hard crack range. At the risk of beating a subject to death, here's a
table
showing
temperature, time increments (delta t) and total time for a recent successful batch. Note that
for
this case, the total
time was around 16 minutes from first heating to pouring the mixture on the aluminum foil
(see
below).
| Fahrenheit |
Celsius |
delta t
(min:sec) |
Total t
(min:sec) |
| 210 |
99 |
0:00 |
0:00 |
| 215 |
102 |
0:20 |
0:20 |
| 220 |
105 |
0:13 |
0:33 |
| 225 |
107 |
|
|
| 230 |
110 |
1:03 |
1:36 |
| 235 |
113 |
|
|
| 240 |
116 |
2:39 |
4:15 |
| 245 |
119 |
|
|
| 250 |
121 |
2:04 |
6:19 |
| 255 |
124 |
|
|
| 260 |
127 |
1:43 |
8:02 |
| 265 |
129 |
|
|
| 270
soft crack |
132 |
1:28 |
9:30 |
| 275 |
135 |
|
|
| 280 |
138 |
1:37 |
11:07 |
| 285 |
141 |
|
|
| 290 |
143 |
1:22 |
12:29 |
| 295 |
146 |
|
|
| 300
hard crack |
149 |
1:12 |
13:41 |
| 305
add nuts |
152 |
0:53 |
14:34 |
| 310 |
154 |
0:40 |
15:14 |
| 315
carmeliza-
tion |
157 |
1:00 |
16:14 |
There doesn't seem to be any secret here and the whole process is over in a little more than a
quarter of
an hour. Still, a batch can refuse to harden after being poured onto the aluminum foil, or it
can
spread out on the aluminum foil by itself or be sufficiently viscous to require a knife to spread
it
to a desired thickness, and harden beautifully.
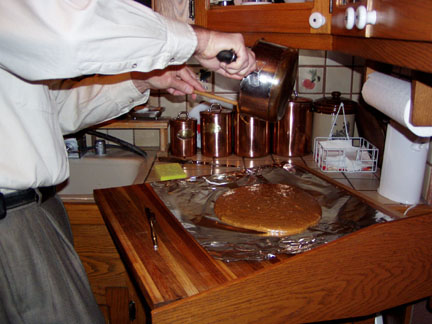
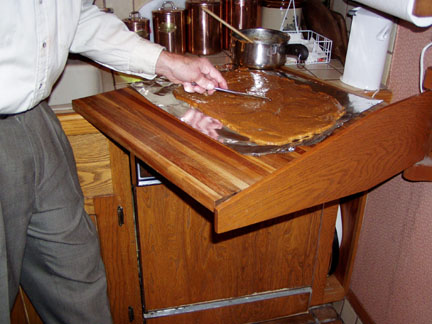
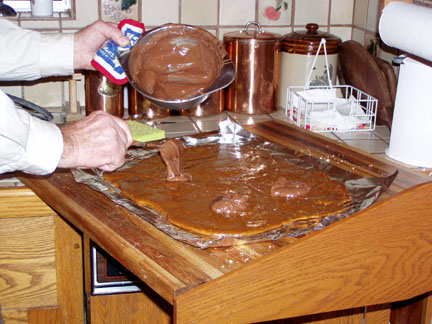
Pour mixture onto large piece of aluminum foil on flat surface (large foil, not the
sandwich
stuff).
Spread with table knife to thickness of about 3/8". Be careful not to get a good skin burn by
touching
the top of the candy with your knuckles. Batch will harden within 15 minutes. If more than
one
batch is to be made, the first batch, while still hot, can be slipped off the chopping block onto
another
slab and then slipped onto another flat surface, like a dining room table (with padding - don't
put
it
on a finished top while it is still hot), but this takes a little practice. The next step can be
done
any
time after it hardens but it is best not to leave the slab overnight, as its low temperature in the
morning will cause it to crack when the melted chocolate is spread over it.
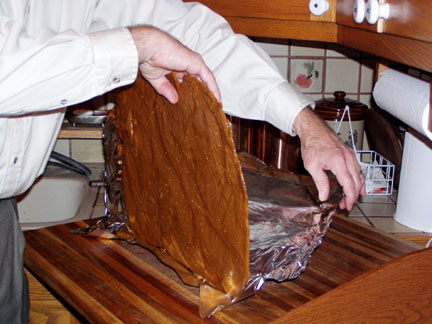
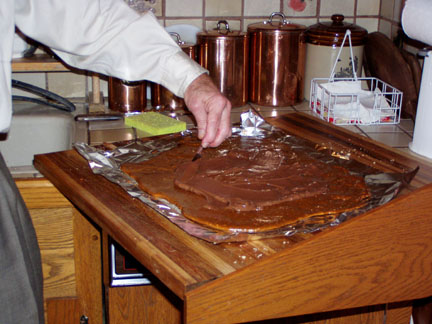
Stand up solid slab on chopping block and peel off aluminum foil for next step. Lay the
slab
down
on the separated aluminum foil.
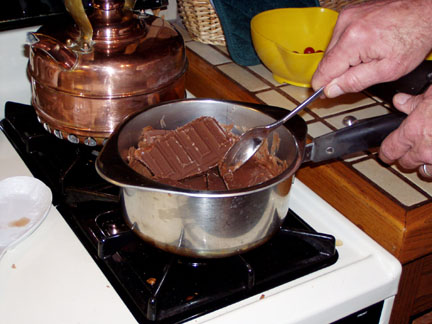
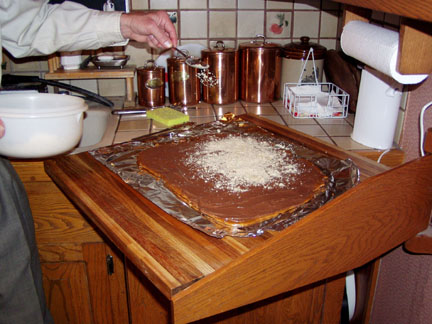
Melt over double boiler a pound of milk chocolate. For American taste, Hershey's works
fine. My
French friends love toffee with Hershey's chocolate but to the European taste, Hershey's tastes
a
little
too
fermented in comparison with Nestle's.* While melting the chocolate, mix 1 cup of
unflavored malted milk with 1 cup ground walnuts and 1 cup ground almonds.
Thoroughly mix nuts and malted milk. This amount is almost precisely what you'll need for
one batch after you've developed some experience making it. If you make more than you
need, the rest of it can be used on a second batch.
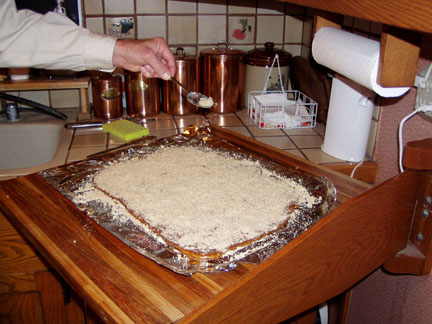
 Spread half
of
melted chocolate on one side of hardened candy. While the milk chocolate is still gooey,
sprinkle
nut-malted milk mixture on surface and press in. Turn batch over and repeat the process on
other
side.
If it cracks while turning it over, just fit the pieces together and continue. Cover with another
piece
of foil and allow to stand overnight. In the morning, break into small chunks.
Spread half
of
melted chocolate on one side of hardened candy. While the milk chocolate is still gooey,
sprinkle
nut-malted milk mixture on surface and press in. Turn batch over and repeat the process on
other
side.
If it cracks while turning it over, just fit the pieces together and continue. Cover with another
piece
of foil and allow to stand overnight. In the morning, break into small chunks.
It turns out that the very special taste of this English Toffee is connected to the candy +
malted milk
+ milk chocolate. It tastes good in any case, but the malted milk curiously imparts an added
effect
which one doesn't fully appreciate without tasting side-by-side a piece of the hardened candy
only
and a piece of the finished candy with malted milk, nuts and milk chocolate.
Don't eat it all at one sitting!
*Legend has it that in the early years of the Hershey company a batch of milk chocolate
was
fermented a little too long, but packaged and sold anyway. However apocryphal that story
may
be,
to every American kid the word Hershey is synonymous with chocolate and nothing tastes
quite
as
good. If you would like to make a taste test on this point, taste first a small piece of Nestle's,
Cadbury's, Ghirardelli's or Guitard's milk chocolate. Then taste a small piece of Hershey's
milk
chocolate. The additional fermentation becomes obvious. One is left with the impression
that
for
the
first time in your life you'll be of the opinion that the Hershey's is a little "off" on the one
hand,
but
"real" chocolate on the other (if you grew up in the U.S.). Everyone ought to do this taste test
at
least once in a lifetime.
Return to other related Web pages
 Department of Chemistry
 CSUDH Home Page
Oliver's Professional Home Page